
REVIEW – Laser engravers have not become the household hobby tool that 3D printers have, but machines like the TwoTrees TS2 10W Diode Laser Engraver make the idea much easier to understand. This was my first serious time with a laser cutter and engraver, and the TS2 left me impressed after a frustrating build, a repair I did not expect to make, and a lot of trial and error across wood, cardboard, aluminum, and small craft blanks.
The short version is that the TS2 costs $569, which is not impulse buy territory. It earns that higher price with a 10W auto-focusing diode laser, a large 450mm by 450mm work area, strong safety hardware, and a feature set that feels above basic entry level. The assembly experience was rough, and my unit arrived with a damaged limiter connection, but once I had the frame squared and the software sorted, the engraver itself performed well.
What the TS2 is
The TwoTrees TS2 is a desktop diode laser engraver and cutter built around a partly assembled metal frame. It can engrave images, text, scanned artwork, and contours, and it can cut thin material when the settings are right. TwoTrees lists the laser at 10W, with a 445±5nm wavelength, an advertised 0.08mm by 0.08mm spot, up to 10000 mm per minute engraving speed, and a cutting depth of about 15mm depending on material.
It supports USB control from a computer, wireless control through the MKS Laser app, and jobs from the internal Micro SD card. LaserGrbl and LightBurn are the main software choices. The machine itself measures 28.86 by 28.39 by 6.77 inches, or 733 by 721 by 172mm, weighs about 14lb, and runs from a 24V 4A DC power supply.


In the boxes
The kit includes the front frame, left and right Y-axis frame sections, back frame, X-axis stepper motor, X-axis crossbeam, laser module, frame screws and bolts, USB-A cable, power adapter and cable, tool kit, safety glasses, and instruction manual. The parts are protected well enough at first glance, but the foam did not prevent the damaged connection I found later.

Core specifications
- Laser Power: 10W (10000mw)
- Laser Type: Auto-focusing Diode
- Laser Spot Diameter: 0.08mm x 0.08mm
- Cutting Depth: about 15mm
- Sintering Temperature: 2192°F (1200°C)
- Processor: 32 bit LX6
- Laser Wavelength: 445±5nm
- Engraving Speed: 10000 mm/min
- Electrical Requirement: 24V 4A DC
- Engraving Area: 17.7 x 17.7in. (450 x 450mm)
- Machine Size: 28.86 x 28.39 x 6.77in. (733 x 721 x 172mm)
- Machine weight: 14lb (6.5kg)
- Engraving Method: USB to Computer, Wirelessly via App, or Internal Micro SD Card
- Engraving Modes: Image Carving, Text Carving, Scanning Carving, and Contour Carving
- File Formats: JPEG, BMP, GIF, PLT, PNG, HPGL, JPG, XJ, SVG, GCODE
- Supported Software: LaserGrbl and LightBurn
- Software Systems Supported: Mac, Windows, and Linux

Hardware design
At a distance the TS2 looks like many open-frame desktop engravers, but the details matter. The frame uses solid metal parts, reinforced joints, and a moving gantry that carries the laser assembly. Most of my photos show the TwoTrees Honeycomb Laser Bed under the machine. That bed is not included with the TS2, but I liked using it because it helps reduce scorching on the work surface and lets smoke and cut debris clear more easily.

The first detail that stood out to me was the red manual focus knob above the laser head. It looks good and gives you a quick way to fine tune the head position before a job.

Those same red anodized accents appear on adjustment sleeves, tensioners, and other controls. They make the TS2 feel more polished than a plain parts-bin frame, and they also show which areas are meant to be adjusted.

Cable routing is another bright spot. The wiring runs through the axes and along plastic cable carriers instead of hanging loosely around the work area.

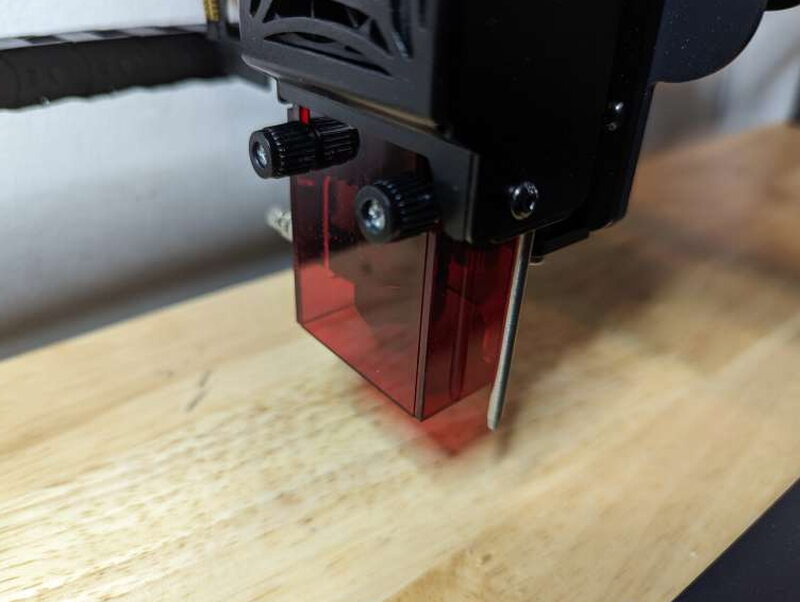
The feature that made the TS2 feel especially beginner friendly is autofocus. A small metal probe next to the laser lowers to touch the material, then the machine uses that reference to set focus. For someone new to engraving, that removes a big source of guesswork.
Safety hardware
Laser safety matters, and TwoTrees gives the TS2 more protection than I expected. The red shield around the laser helps block stray light, and an additional red shield runs along the controller side of the machine. I still treated the included glasses as mandatory whenever the laser was active.


The controller adds a gyroscope that stops the unit if it tips past 15°. It can also shut down when the controller detects something blocking the laser head, which helps avoid extended laser output in one spot.

On top of the controller are the red emergency stop and a yellow flame detector alarm. Pressing the red button immediately cuts power. Twisting it clockwise restores power, so it also works like the main power control. The flame alarm reacts when the sensor near the laser head sees fire or heavy smoke, then sounds an alarm, lights the yellow indicator, and shuts the machine down.


All of those pieces add up. The frame shape is familiar, but autofocus, better wiring, shield placement, the emergency stop, tilt protection, and flame detection give the TS2 a stronger out-of-box safety story than many lower-cost engravers.

Assembly experience
The TS2 arrives partly built, so I expected setup to be easier than assembling a machine from loose rails and brackets. It was not. The instruction manual is poorly written, and several steps were unclear enough that I had to undo work and rebuild sections after realizing what the directions meant.
My review unit also arrived with a broken connection on an axis limiter. A weak solder joint had let go, so the small wire that tells the machine when the gantry reaches the end of travel was disconnected.

I had to take the mount apart and resolder the connection. That fixed the problem, but it is not a repair I want to make before a new machine has completed its first job.

Once that was fixed, the main frame assembly began. The frame sections fit together firmly and lock down with bolts, but the TS2 needs careful alignment so the gantry moves smoothly and remains square.

Calibration takes patience because tightening one bolt can pull another part slightly out of alignment. The ruler markings on the axes helped me confirm that both sides were moving evenly.


The laser module comes preassembled, so mounting it to the gantry is one of the more direct steps. The wiring connectors are clearly labeled, which makes it hard to plug the module and stepper motor wiring into the wrong places.


After the wiring was connected, the last mechanical work was belt tensioning. The adjustment knobs at the ends of the gantry make that part simple compared with the earlier frame alignment.

One loose-looking black tube is not a mistake. It connects to an optional air assist pump, which can blow air at the cut point to improve cutting and reduce smoke buildup.
Software setup

TwoTrees points users to LaserGrbl and LightBurn. LaserGrbl is free and comparatively basic, while LightBurn is more powerful and has a steeper learning curve. The TS2 includes a temporary LightBurn license, but I spent most of my time in LaserGrbl because it became understandable after some exploring.
Both programs need the TS2 connected over USB and configured for the machine. If you want to avoid the cable, the MKS Laser app for Android and Apple iOS can send jobs over Wi-Fi. I liked that the app can import images from a phone and adjust them before sending, but I was less comfortable using it because it did not give me the same sense of control as the desktop programs.


Test materials
TwoTrees supplied a range of materials for testing, including stainless steel dog tags, wood keychains, anodized aluminum business cards, thin Kraft cardboard, and Basswood Plywood. That gave me enough variety to learn quickly that each surface needs its own settings.

I started with a LaserGRBL accuracy file on a non-anodized aluminum business card. The file is meant to test mechanical precision and laser spot size, so it was a good first look at how the TS2 handled fine detail.

With default settings, the first result was faster and cleaner than I expected. I ran the test multiple times while changing settings to see how the engraving changed.


Logo engraving and cutting
Next I used the TwoTrees logo file from the Micro SD card. I imported it into LaserGrbl, scaled it up, and aimed for a simple surface mark on thin Kraft cardboard.


The logo looked good overall, but the scan lines were visible. I also set the intensity too high, so the laser cut through the cardboard in several places instead of only marking the surface.


After more adjustment, I changed the job into a full cut and scaled the logo to span the cardboard sample. The TS2 cut the cardboard easily and reproduced the shape well. My own design planning was the weak part, since all of the loose pieces and the negative spaces inside the letters dropped out.

Engraving the logo on a thin aluminum business card gave me one of the best results. The focus and settings were right, leaving crisp edges and a deep dark center. Reusing those settings on a wooden dog tag was a mistake. It produced enough smoke to test the TS2 smoke and fire alarm, plus my apartment smoke alarm.
I also tried the logo on Basswood Plywood. The TS2 burned the larger design quickly, though scan lines were visible again. Slowing the job down would likely improve that result.

The blue anodized aluminum card produced my favorite finish. The laser removed the anodized layer and left a bright metallic logo against the blue surface. I worked from a vector version of the logo, and that seemed to give the best results because vector artwork scales without losing resolution.

The final small logo test was a wood keychain. Positioning that tiny piece under the laser was the hardest part, so I used scrap first. After a few attempts, the actual keychain engraving came out clean, with a dark burn that made the logo stand out.
Cutting a small box
For the last project, I used the TS2 to cut Basswood Plywood parts for a small box. There are many free box patterns online, and I used a web app that lets you set the dimensions and export a cutting file.

The thin plywood was no problem for the 10W laser, and the cut parts snapped together as designed. I ran out of sample material before trying a larger project, but this test gave me confidence that the TS2 can handle more ambitious cutting with enough material and tuning.

What worked well
- The safety features are strong, including the side shield, laser shield, emergency stop, tilt shutdown, and flame alarm.
- Autofocus makes switching between materials much less intimidating.
- The 450mm by 450mm work area is useful for larger projects.
- The 10W laser is fast and capable on cardboard, thin plywood, wood blanks, and aluminum cards.
What frustrated me
- The instructions for setup, software, and operation are very poor.
- My unit arrived with a damaged limiter connection that needed resoldering.
- Assembly and calibration took more patience than expected.
Quick Questions
Q: Does it have autofocus?
A: Yes, a metal probe lowers to touch the material and sets focus automatically, removing a lot of the guesswork for beginners.
Q: What safety features does it include?
A: A red laser shield, a tilt sensor that shuts it down past 15 degrees, an emergency stop button, and a flame/smoke alarm that halts the machine.
Q: What’s the work area size?
A: 450mm by 450mm (17.7 by 17.7 inches).
Q: Does it arrive fully assembled?
A: No, it ships partly assembled and requires real frame assembly and calibration; this review’s unit also arrived with a broken limiter connection that needed resoldering.
Final thoughts
The TwoTrees TS2 10W Diode Laser Engraver was my first real experience with laser engraving and cutting, and it made a strong case for the hobby once I got past setup. The manual needs serious improvement, and my damaged limiter connection should not have happened. Those are real problems. Once repaired and aligned, though, the TS2 worked reliably with LaserGrbl, moved quickly, focused easily, and produced results that made me want to keep experimenting.
At $569, the TS2 is more expensive than a basic beginner engraver, but the bigger work area, 10W laser, autofocus system, and safety hardware help justify the price. If you are an advanced hobby beginner who wants something more capable than the cheapest laser engravers, the TwoTrees TS2 10W Diode Laser Engraver is a very good pick.
Price: $569
Product Link: TwoTrees
Source: The sample of this product was provided by TwoTrees.
RATING: 4 stars


