
REVIEW – Twenty-five yards downrange, my target groups used to be a guessing game. Fire a few rounds, set the pistol down, dig a pair of ancient 2-pound Emerson binoculars out of my bag, squint through them until my eyes watered, repeat. That is not accuracy training, that is a workout. The Nocs Provisions Standard Issue Waterproof Binoculars ended that routine. At $95 they are compact, waterproof, and sharp enough to embarrass my old pair, and paired with Nocs’ $27 Photo Rig they turn into a phone-mounted spotting scope that actually keeps up with a range session.
The Basics
These are 8×25 compact binoculars: 8x magnification, a 25mm objective lens, an IPX7 waterproof rating, and a nitrogen-filled body so fog is a non-issue. Nocs sells them in eight colors; the review pair is Squid Ink, which is their way of saying black. At 11.85oz they barely register in a bag. The optional Photo Rig is a machined aluminum bracket that clamps a smartphone to the eyecup so you can shoot photos and video through the binoculars themselves.

Both boxes fold flat into their own protective shape rather than relying on foam or a hard shell, and each one tucks in a small illustrated card walking through setup.

What You Get
- Nocs Standard Issue Binoculars
- Carrying Pouch
- Lens Cloth
- Strap
- Optional:
- Photo Rig Smartphone Adapter

By the Numbers
- Magnification: 8x
- Objective Lens Diameter: 25mm
- Focus Type: Center
- Field of View at 1000yds: 357ft. (108M)
- Field of View Angle: 6.8º
- Resolution: 8ft. (2.44M)
- Minimum Focal Length: 13ft. (4M)
- Exit Pupil Diameter: 3.2mm
- Interpupillary Distance: 2.2” – 2.9” (56mm – 74mm)
- Diopter System: ±3º, Right Eye
- Eyecup System: Twist Up
- Eye Relief: 7mm – 10mm
- Number of Lenses: 6 pieces / 4 groups
- Lens Coating: Fully Multi-Coated, Anti-reflective
- Lens Type / Glass: GoodEye Emerald
- Prism Type: BaK4 / Roof
- Waterproof Rating: IPX7 – 30 min under 3ft. water
- Fog proofing: Nitrogen-filled and O-ring sealed
- Height: 1.77″ (45mm)
- Dimensions: 4.53” x 4.25” (115mm x 108mm)
- Weight: 11.85oz (336g)

Design & Build
At a glance these read as ordinary binoculars. Look closer and the surface stops behaving like a normal pair, curves folding into each other in a way that has no real functional reason to exist except that it looks good.

Those curves double as a grip surface. The whole body is wrapped in a textured coating that stays grippy wet or cold, and it doubles as a bit of shock absorption if you drop them.

The focus knob sits dead center and is sized to be found by feel, no looking down required. It’s bracketed by two eyecups that are just as generously sized.

Because the eyecups are so large, holding these up to your face for a while doesn’t get uncomfortable, and adjusting them takes no real effort.

Each eyecup twists out to extend eye relief from 7 to 13mm, which means they work equally well whether you’re wearing glasses or not.

The right eyecup carries a notched diopter ring, the control you use to fine-tune focus for that eye specifically.

Small metal loops sit near the eyecups on both sides, where the carrying strap clips in.

I’ll be honest about the strap: it’s forgettable, a thin nylon band with a couple of plastic buckles, nothing special. The included microfiber cloth for the lenses is the more useful item in that pile.

Clean lenses only matter if they survive a drop, and Nocs clearly thought about that. Raised ridges run along the front edge specifically to intercept impact before it reaches the glass.

Inside, the lenses sit in a medical-grade O-ring housing filled with nitrogen to keep fogging away for good. The prisms are BaK-4, a glass type known for sharper image quality, and all six lens elements carry a full multi-coating that boosts light transmission. The end result is a noticeably bright, clear view.

The hinge lets the barrels swing to fit an interpupillary distance of 56 to 74mm, wide enough to fit most faces without a fight.

A small carrying pouch is included for storage, and in a pinch it also works as a stand-in lens cleaner.

The optional Photo Rig is its own piece of hardware: a reinforced cast aluminum frame carrying a spring-loaded clamp built to grip phones between 62 and 104mm wide, and it’ll mount to basically any binoculars or monoculars, not just these.

On the binocular side, a screw-type clamp grips eyecups between 24 and 46mm wide to hold the Rig in place.

That clamp is shaped like a v with small cushions lining the inside, there to protect the eyecups from getting marked up. Worth going easy on the tightening.

The phone-side clamp holds most phones securely, though on my Pixel 5 specifically the clamp arms landed close enough to the side buttons that positioning mattered.
Getting Started
The binoculars themselves need zero setup out of the box. The Photo Rig is where a few extra steps come in.

Before anything else, the Rig has to clamp onto one of the eyecups. I always pick the left one, since the right eyecup carries the diopter ring and clamping there risks throwing off your focus setting.

Once that clamp is locked down, the phone slides into the spring-loaded phone clamp. A small adjustment screw on the back lets you shift the phone up or down after it’s seated, useful for keeping the clamp arms clear of side buttons.

Getting a clean image means lining the phone’s camera lens up dead center with the eyecup. Off-center and the shot just doesn’t come through right.

Once everything lines up, the whole rig runs one-handed without much fuss.

With the Photo Rig set up, it was time to take the whole thing to the range and actually put it to work.

Living With It
This is the part that actually changed my range routine. Even at a close 25 yards, checking my groupings used to mean pausing every few shots, setting the pistol down, and squinting through my old Emerson binoculars, or roping a buddy into spotting for me and eating the jokes about my aim that came with it. Neither of those happens anymore.

A sandbag made lining up the Nocs on the target simple, though since I was shooting the setup photos with my phone, the Photo Rig itself doesn’t show up doing its actual job in these shots.

I start most sessions checking a rifle’s zero at 25 yards. At standard zoom through the Photo Rig, the image comes through clean, though you can still see a faint ring where the phone lens meets the eyecup.

Bump the phone to its native 2x zoom and that ring disappears entirely while the image stays sharp.

Push past 2x and things soften up a bit, but it’s still plenty usable for reading my own groupings.
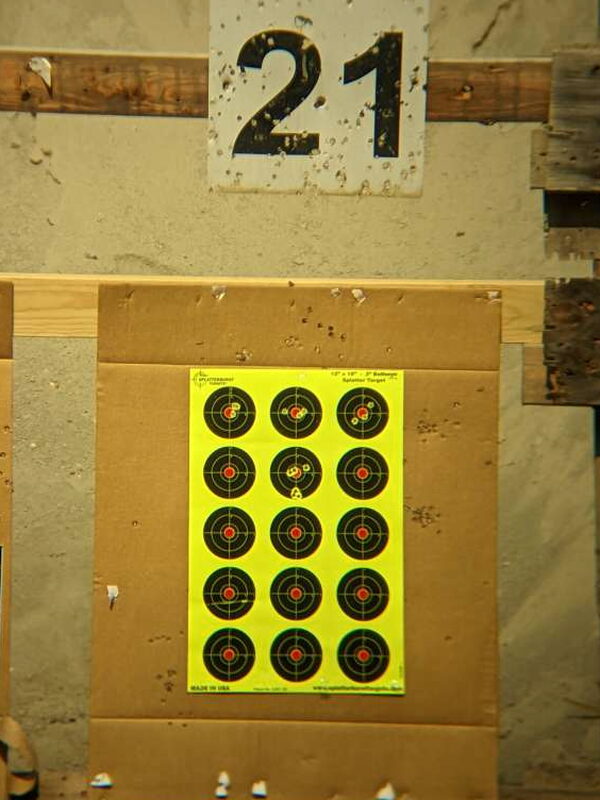
Cranked all the way to max zoom at 25 yards, sharpness takes a real hit, but the groupings themselves are still obvious. Parking the phone on the sandbag with the screen visible basically turned it into a live target monitor, and it genuinely made me a better shot.

What kept surprising me through all of this was how consistently good the glass and the Photo Rig performed together. Getting the phone perfectly vertical took some fiddling with the sandbag, but I got there. Landscape orientation was a different story; I never did manage to line that one up cleanly.

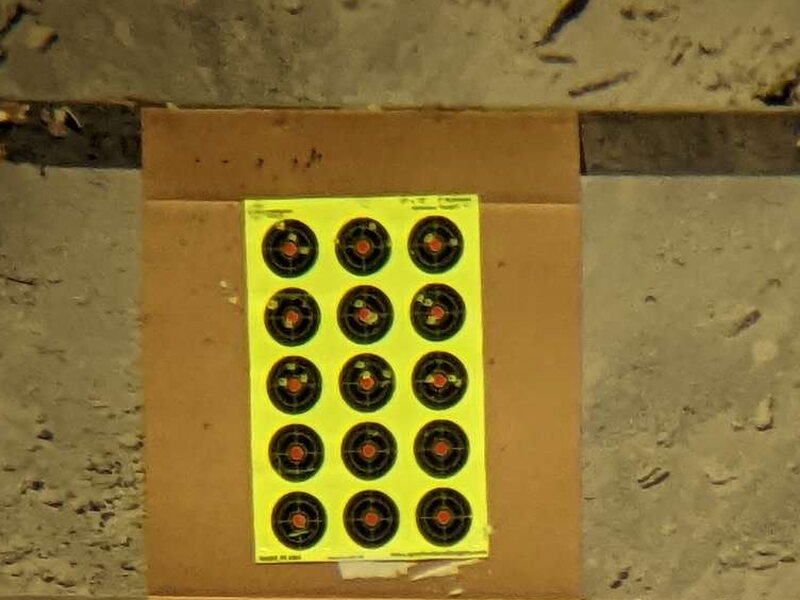
After confirming zero, I moved targets back to 50 yards, and this is where the setup really earned its keep. Standard zoom keeps both the target and background sharp, with the lens ring only slightly more visible than it was at 25 yards.

Bump to 2x again and the ring vanishes while the groupings sharpen up nicely.

Zoom in further and the image holds up well, though the focus seemed to drift a touch, the ridge behind the target read slightly crisper than the target itself.

Maxing the zoom out didn’t hold up quite as well as it did at 25 yards, but it stayed usable enough to track my accuracy.
Trading my heavy, blurry Emerson binoculars for this pair is something I should have done a lot sooner. They’re rugged and small enough that they go in my range bag automatically now, no second thought, no matter the weather. The glass punches well above what I’d expect from something this compact, and being able to capture and share what I’m seeing straight from my phone through the Photo Rig just made these an even easier piece of gear to reach for.

The Good
- Rugged, durable construction
- Clear, bright image
- Simple, functional design
The Not So Good
- Getting and holding a good angle with the Photo Rig takes practice
- The included strap feels like an afterthought
- No lens caps in the box
Quick Questions
Q: Are they waterproof?
A: Yes, IPX7 rated, rated for 30 minutes submerged under 3 feet of water, with a nitrogen-filled body to prevent fogging.
Q: Does the Photo Rig work with any binoculars?
A: Yes, its eyecup clamp fits eyecups between 24 and 46mm wide, so it isn’t limited to the Nocs binoculars specifically.
Q: Does the kit include lens caps?
A: No, that’s one of the review’s noted gaps – no lens caps are included in the box.
Q: How wide is the eye relief range?
A: 7mm to 13mm as the eyecups twist out, working well whether or not you wear glasses.
The Verdict
The Nocs Provisions Standard Issue Waterproof Binoculars and Photo Rig earned a permanent spot in my range bag. Whether it’s checking groupings, watching wildlife, or just messing around on the water, these deliver a clear, bright view in a body built to actually survive being used. The Photo Rig turns any binoculars into a phone-mounted camera, with the caveat that dialing in the right angle takes some patience. At $95 for the binoculars alone, this is a genuinely competitive price, backed by a lifetime warranty that doesn’t come with fine print.
Price: $95.00 – Binoculars, $27.00 – Photo Rig
Product Link: Nocs Provisions
Source: The sample of this product was provided by Nocs Provisions.
RATING: 5 stars


