
REVIEW – Podcasting still has one of the friendliest entry points in media. You can start with a laptop microphone and an idea, which is why everyone from celebrities to hobbyists jumped in during the pandemic years. The step from “I can record” to “this sounds professional” is where a kit like the Focusrite Vocaster Two Studio starts to make sense. At $499.99, it is not an impulse buy, but it gathers the core hardware a host and guest need into one polished package.
The bundle centers on the Vocaster Two Hub, a USB audio interface with two XLR mic inputs, two headphone outputs, speaker outputs, phone and camera connections, Bluetooth, and simple controls for gain, muting, and vocal enhancement. Focusrite adds its Vocaster DM14v dynamic microphone, HP60v closed-back studio headphones, an XLR cable, and a USB-A to USB-C cable, so the kit feels ready for recording almost immediately.
Package and kit contents

Focusrite ships the kit in a sturdy box with product photos and feature details on the outside. Inside, the gear is protected in formed packing that keeps the interface, microphone, headphones, and cables separated.

The box includes the Vocaster Two Hub USB interface, Vocaster DM14v microphone, Vocaster HP60v headphones, XLR to XLR microphone cable, and USB-A to USB-C cable.

Key specifications
- 2 XLR microphone inputs
- 2 1/4″ balanced speaker outputs
- 2 1/4″ headphone outputs
- 3.5mm TRRS phone connection
- 3.5mm TRS camera out
- Bluetooth connectivity
- USB-C port
- Kensington MiniSaver slot
- Compatibility: Mac, Windows, iPad.
- Power Requirements: USB-3.0 Bus power 5V @900mA 4.5W
- Product Dimensions:
- Size: 224.5mm (8.84″) width x 113mm (4.45″) depth x 50.5mm (1.99″) height
- Weight:.93lbs (.42kg)
- Number of Preamps: 2
- Auto Gain functionality
- Loopback: 2 x Stereo
- Microphone: Vocaster DM14v
- Connection: XLR
- Type: Dynamic
- Polar Pattern: Cardioid
- Sensitivity: (0dB = 1V/Pa at 1kHz) -57dB
- Frequency Response: 50Hz – 16kHz
- Impedance: (@1kHz) – 200Ω
- Mounting: Standard 5/8″ with 3/8″ adaptor
- Net Weight: 1.4lbs (655g)
- Diameter: 60mm
- Length: 191mm
- Headphones: Vocaster HP60v
- Impedance: 32Ω
- Sensitivity: 98dB ±3dB
- Frequency Response: 20Hz – 20kHz
- Max. Power Rating: 1.2W
- Type: Closed-back
- Driver Diameter: 50mm
- Cable Length: 3m
- Connectors: 3.5mm stereo jack with 1/4″ screw-on adaptor
- Weight:.65lbs (288g)
- Included Software:
- Hindenburg LITE and 6-month Hindenburg PRO Trial
- aCast – 6-month Influencer Plan
- SquadCast – 3-month Pro + Video Trial
- Ampify Studio – 6-month Premium Trial
Hub design
Focusrite has spent close to thirty years making audio interfaces, and that experience shows in the Vocaster Two. The matte black body, red trim, clear labels, and simple control layout make the hub feel approachable instead of intimidating.

The front edge keeps the two headphone jacks within easy reach. One is labeled Host and the other Guest, which matches the rest of the hub’s two-person workflow.

The rear panel is where most of the connections live. There are two XLR inputs for Host and Guest microphones, a TRRS phone input, a TRS camera output, two 1/4″ balanced speaker outputs, and the USB-C computer connection.

Focusrite also puts the power button, Bluetooth button, 48V phantom power button, and Kensington MiniSaver slot on the back. The layout is busy, but everything is labeled well enough that setup does not feel like guesswork.

On top, the center dial sets microphone gain while the two outer dials control headphone volume. The large dials are easy to grab while recording.

The rubberized buttons below the dials are recessed and light up when active. Mute controls glow red for Host and Guest. Enhance buttons glow green and cycle through Clean, Warm, Bright, and Radio voice profiles. The Host and Guest Auto Gain buttons listen while you speak normally for ten seconds, then set the gain automatically.

Microphone and headphones
The included Vocaster DM14v is a dynamic microphone with an aluminum body and built-in windshield. Its cardioid pickup pattern helps focus on the person speaking and keeps background room noise lower than more sensitive mic types usually would.

The microphone uses a standard 5/8″ mount and includes a 3/8″ adaptor, which makes it compatible with many common stands and arms. One surprise is that the kit does not include a mic stand.

The XLR connection is another reason the kit feels like a real upgrade from simple USB microphones. The supplied XLR cable connects the DM14v to the Vocaster Hub and helps deliver the clear sound I heard during testing.

The HP60v headphones are built for monitoring while recording. They are closed-back on-ear headphones with a wide frequency response, and I found them comfortable enough for longer sessions. In my opinion, on-ear headphones can be easier to wear for extended stretches than over-ear designs.

The frame feels durable, the headband is cushioned, and the ear cups are padded. The large 50mm drivers give the headphones a clear, accurate sound for tracking voice recordings and mixes.

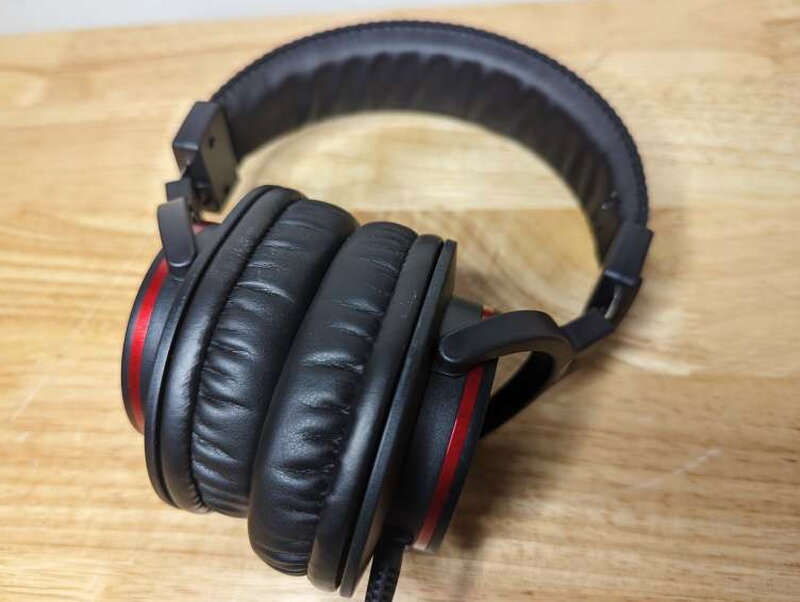
The ear cups sit snugly and provide helpful isolation from outside noise, which matters when you are listening for mic problems or background sounds during a take.

The thick headphone cable feels premium and sturdy. It ends in a 3.5mm stereo plug and includes a 1/4″ screw-on adaptor for use with the Vocaster Hub and other audio gear.

The remaining cables are exactly what the kit needs: an XLR to XLR microphone cable and a USB-A to USB-C cable for connecting the interface to a computer.

As a complete hardware package, the Vocaster Two Hub, DM14v microphone, and HP60v headphones match the level of build quality I expect from Focusrite gear.

Setup and software
Getting started involves installing drivers, setting the computer’s input and output devices, and dialing in audio. Focusrite’s website makes that process less intimidating by walking through the setup step by step and linking to support articles if something goes wrong.

The setup flow covers connecting the hardware and downloading the bundled software, including Hindenburg. Hindenburg is a podcast and journalism-focused audio editor, and this kit includes Hindenburg LITE plus a 6-month Hindenburg PRO Trial.

Once the software is installed, Vocaster Hub gives you control over mic sound, Auto Gain, and the four Enhance options: Clean, Warm, Bright, and Radio. Each can be applied separately to the Host and Guest inputs.

The last part of setup was arranging my own recording space. My desk area is cramped, but the kit fit without much disruption. Since no mic mount is included, I attached the DM14v to the telescopic mic stand I used while reviewing the JLAB Audio Talk USB Microphone.

Everyday use
The Vocaster Two Studio became my main sound setup for more than a month. I used it for online work meetings, music recording with the dual XLR inputs, and test recordings for a podcast idea I have been considering. Across those uses, it made recording and streaming cleaner and easier.

The microphone made my voice sound terrific, the headphones delivered clear monitoring, and having mute, gain, and enhancement controls on the hub was genuinely useful. The one limitation I ran into was app compatibility. In Microsoft Teams, for example, I could not use the Vocaster’s Loopback feature, which is meant to route computer audio as a separate source while the other inputs remain active.

Sample recordings
For testing, I recorded samples with no enhancement and with all four Vocaster Two enhancement modes. I also recorded one comparison sample using the internal microphone on my Microsoft Surface Book 2.
The first Vocaster Two sample uses the microphone without any Vocaster audio enhancement.
I then tested the enhancement modes, beginning with Clean. It was not my favorite profile, though it did add a crisp sound.
The Warm enhancement gave the recording some welcome texture.
The Bright mode raises the treble, but to my ear it also leaves the voice a little tinny.
Radio was my favorite enhancement because it balanced deeper bass with a small amount of compression.
After that testing, I came away impressed by how easily the Vocaster Two Studio helps both beginners and more experienced users produce better audio.
Pros
- Excellent sound quality from the microphone
- Very easy to set up out of the box
- Outstanding build quality
Cons
- Loopback audio does not work in all apps
- No included mic stand
Quick Questions
Q: Does the kit include a mic stand?
A: No, that’s one of the review’s noted gaps – the DM14v microphone has no included stand or mount.
Q: Does Loopback work in every app?
A: No, it didn’t work in Microsoft Teams during testing, though it worked in other software.
Q: How many mic inputs does the hub have?
A: Two XLR inputs, labeled Host and Guest, each with its own headphone output and gain/enhancement controls.
Q: What software is included?
A: Hindenburg LITE plus a 6-month Hindenburg PRO trial, along with trial periods for aCast, SquadCast, and Ampify Studio.
Final thoughts
The Focusrite Vocaster Two Studio podcasting kit is an excellent option for someone starting a podcast or upgrading from a simpler recording setup. The dynamic microphone, closed-back headphones, two-input audio interface, guided software setup, Auto Gain, and Enhance modes make it feel complete and easy to use. The missing mic stand and inconsistent Loopback support are real drawbacks, but they do not outweigh how good the kit sounds and how smoothly it works. At $499.99, it is a serious purchase, yet it is also a strong all-in-one podcasting kit that deserves consideration.
Price: $499.99
Product Link: Focusrite
Source: The sample of this product was provided by Focusrite.
RATING: 4 stars


