
REVIEW – My hunt for a robotic desk companion has turned up plenty of near-misses. The ClicBot (reviewed June 2022) and the Petoi Bittle (reviewed November 2022) both came close but never quite landed. So I kicked the search up a notch and started sharing my workspace with the Elephant Robotics myCobot 280. This is a serious step up in complexity and capability from anything I’d tried before, and the price reflects that. The kit I reviewed runs $638, with accessories adding anywhere from $100 to $1000 more. That jump in cost buys a genuine jump in what the thing can actually do, even if getting there takes real effort.
The Basics
The myCobot 280 is a six-axis robotic arm built for research and education, with support for Python, myBlockly, C++, and Arduino. It’s built around the M5Stack, a modular, stackable developer kit running on an ESP32 core. My review kit shipped with an Adaptive Gripper, Base Plate, and Gamepad controller.

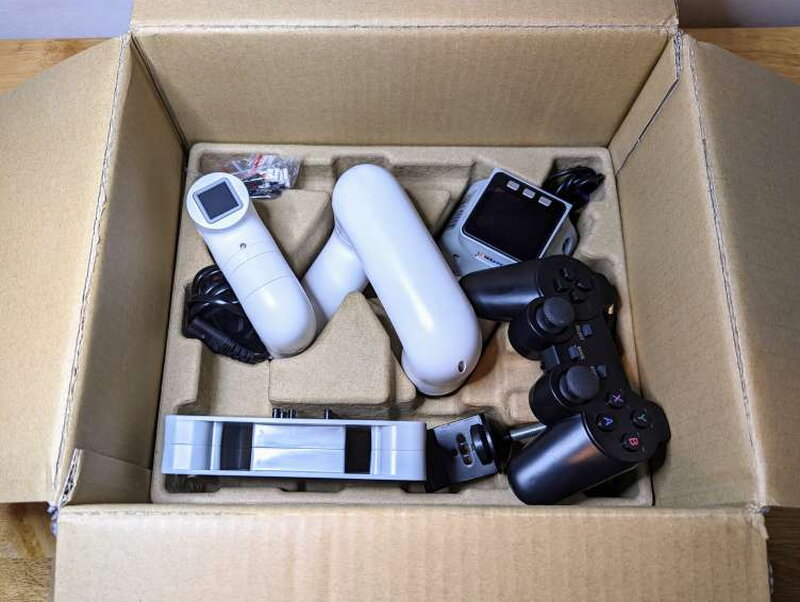
It arrives in a plain white box with just the Elephant Robotics name printed on the outside. Inside, everything sits in molded cardboard, with the Adaptive Gripper shipped separately in its own box.
What You Get
- myCobot 280 M5 Robotic Arm
- Power Supply
- GPIO Jumper Wires
- USB-A to USB-C Cable
- LEGO Connectors
- G-Base and Clamp
- myCobot Gamepad

- Adaptive Gripper

By the Numbers
- Degree of Freedom: 6
- Payload: 250g
- Arm span: 350mm
- Working radius: 280mm
- Repeatability: ±0.5mm
- Weight: 850g
- Power Input: 8V, 5A
- Material Industrial: Nylon
- Working Condition: -5°C to 45°C
- Communication: USB Type-C
- M5STACK Basic:
- ESP32-D0WDQ6: 240MHz dual-core, 600 DMIPS, 520KB SRAM, Wi-Fi, dual-mode Bluetooth
- Flash: 16MB
- Power Input: 5V @ 500mA
- Port: USB Type C x 1, GROVE (I2C+I/0+UART) x 1
- Core Bottom Port: PIN (G1, G2, G3, G16, G17, G18, G19, G21, G22, G23, G25, G26, G35, G36)
- IPS Screen:
- Size: 2 inch
- Resolution: 320×240
- Color: Colorful TFT LCD, ILI9342C
- Brightness: 853nit
- Speaker: 1W-0928
- Button: Custom x 3
- Battery: 110mAh @ 3.7V
- Antenna: 2.4G 3D Antenna
- Operating Temperature: 0°C to 40°C
- M5STACK Atom:
- ESP32: 240MHz dual-core, 600 DMIPS, 520KB SRAM, Wi-Fi, dual-mode Bluetooth
- Flash: 4MB
- Power Input: 5V @ 500mA
- Port: USB Type C x 1, GROVE (I2C+I/0+UART) x 1
- PIN Interface: G19, G21, G22, G23, G25, G33
- RGB LED: WS2812C 2020 x 25
- MEMS: MPU6886
- IR: Infrared transmission
- Button: Custom x 1
- Antenna: 2.4G 3D Antenna
- Operating Temperature: 0°C to 40°C

The Controller
Strip the myCobot 280 down to its basics and you get a “brain” with a small screen, six movable joints each with its own servo, and a 5×5 RGB LED matrix on the head.

That brain is built on the M5Stack BASIC, a modular development kit meant for more complex electronics projects. It has a two-inch screen, three buttons, and assorted inputs and ports. Its basic menus give you access to core functions like calibration and setting up communication protocols.

The underside holds a Micro SD slot alongside GPIO connectors, which let the unit talk to external electronics like sensors or motors.

The top carries another set of GPIO connectors.

One side holds the speaker plus another GPIO strip, along with a printed label showing the model, degrees of freedom, and power specs.

The other side carries the power port, a USB-C port, more GPIO pins, a small power/reset button, and three Grove connectors, which are 4-pin plugs similar to GPIO but used for hooking up sensors, actuators, or modules.
The Head

The “head” carries a second, smaller M5Stack: the ATOM Matrix.

Those RGB LEDs are fully programmable, and the smaller unit has its own set of input ports, much like the main controller.

The top of the head has GPIO connections, a Grove connector, and a USB-C port.

Each joint segment carries its own connector for linking to accessories like the gripper.


The back of the head has a rotatable servo with a 3×3 grid of LEGO connector holes.
Mounting Hardware

The bottom of the base has a similar grid, 5×5 this time, also for LEGO connectors.

LEGO connector pins attach the myCobot 280 to most of its accessories, including the G-Base, which keeps the unit steady as it moves through its full range of motion. Elephant Robotics tosses in a bag of 30 to 40 of these for accessories or for fastening the arm to its base.

The G-Base itself is held in place by an included adjustable clamp.

A power brick and cable handle the arm’s power supply.

A USB-C to USB-A cable in the box handles the connection to a computer for programming.

You can even drive the myCobot with the included Gamepad, which pairs to a PC through its own dongle.

A handful of jumper wires round out the kit, for wiring the unit to other sensors or modules through the GPIO or Grove ports.
The Arm Itself

The arm’s six segments are sturdy ABS plastic, joined together at 90-degree angles.

It ships pre-assembled, with every segment and the head already attached to the base.

The Adaptive Gripper is a pincer-style attachment that fastens to the head with a small wire, talking to the main unit through a Grove connector.

Both of the gripper’s fingers carry soft foam pads to improve grip on whatever they’re holding.

LEGO connector holes on the bottom and back of the gripper let you attach it to the unit.
Getting Started
Physical setup is minimal, since the main unit ships preassembled. All that’s really left is attaching the base and any accessories.


The LEGO connectors do exactly what you’d expect, holding the main unit tightly onto the base.

A basic clamp holds the base to the edge of a table or desk.

The clamp has five holes if you’d rather fix it down more permanently with screws.

Attaching the Adaptive Gripper means fastening it to the head with LEGO connectors too.

There are two ways to attach the gripper, but either one requires plugging its wire into the Grove port on the side of the main unit.
Once the arm is fastened to its base with any accessories attached, plugging in the power cable turns everything on automatically. Before you do anything else, it’s worth calibrating the servos so the controller knows exactly where each segment sits. The menus are easy to navigate, and picking Basic Calibration starts the process.

Every segment has a small notch, and calibrating the servos means lining all of those notches up by hand. As the sequence runs, each servo releases so you can align it, then locks once the next one comes up.


Even the rotating segment on the head has a notch that needs lining up.

Once everything’s calibrated, running a test nudges each servo slightly and returns it to position, confirming it’s working. With the arm powered up, calibrated, and its accessories attached, it’s finally time for the fun part.

Living With It
The myCobot 280 has a steep learning curve if you want to do anything beyond the built-in Record and Playback feature.

Record and Play lets you move the arm through a sequence by hand, capture it, and play it back on command.

To record a sequence, start by positioning the arm where you want it to begin, then hit Record. Pick where to store it, either internal RAM or the unit’s 16MB of Flash. From there, move the arm by hand through whatever motion you want, and the myCobot captures it, with a default recording window of 100 seconds. Stop and save when you’re done, and the sequence saves automatically. Hit Play, and the arm loops through the recorded movement endlessly.

Record and Play is fun, but it barely scratches the surface of what this arm can actually do. Getting into its real capabilities means connecting it to a computer and programming it in one of its supported languages. USB is the easiest path, and you’ll need to select the USB option in the menu to enable the connection.

The bundled USB-A to USB-C cable makes that connection.

I used a Windows 11 laptop running myBlockly, a visual programming language built to help beginners grasp coding concepts using blocks that snap together instead of typed-out code.
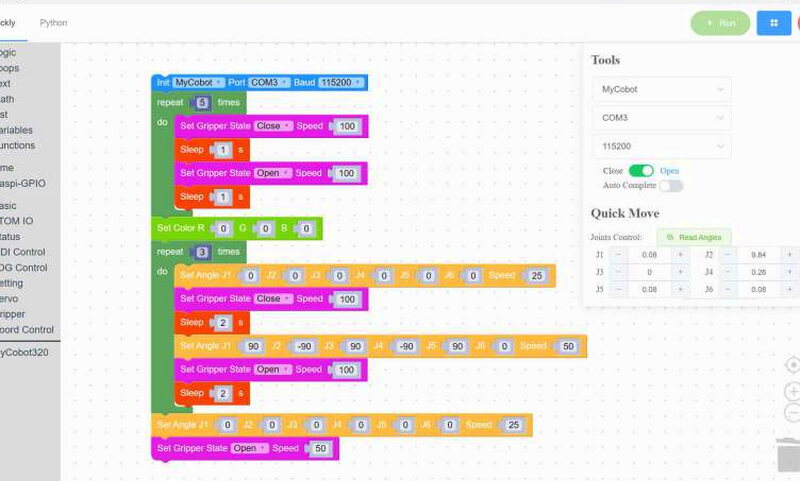
The myCobot’s version of myBlockly turns every function into a block you can arrange into simple or complex sequences, then run directly on the arm.

The interface even shows the Python translation of your Blockly sequence, which is a nice touch for teaching or learning Python alongside it.

To put both my programming and the arm’s dexterity to the test, I set out three small cubes and a box, marking each position with tape so I could repeat the test. Then I tried several different ways to program the myCobot to drop each cube into the box.

The whole exercise was rewarding, frustrating, and eye-opening in roughly equal measure. Whether I used myBlockly, Python, or Record and Play, actually finishing the task turned into a real chore.

In the end, the only method that reliably got all three cubes into the box, over and over, was Record and Play.
It took a lot of trial and error, and I do mean a lot, but I eventually recorded a specific set of maneuvers to move all three cubes and had the arm play it back on loop. The results weren’t flawless, but every cube made it into the box.

All told, I genuinely enjoy programming this thing, and working with it has sharpened my coding skills more than I expected. Straight out of the box, it won’t act as a standalone autonomous desktop companion, but I never really expected that from it. The real appeal of the myCobot 280 is in the sheer number of ways you can program and use it.
The Good
- Great way to teach or learn programming with tools like Blocky or Python
- Sturdy industrial construction
- Ships pre-assembled
The Not So Good
- Expensive
- Instructions are confusing
- Geared more for advanced users
Quick Questions
Q: Does the myCobot 280 arrive pre-assembled?
A: Yes, it ships pre-assembled with every arm segment and the head already attached to the base; only the base mounting and any accessories need attaching.
Q: What programming languages does it support?
A: Python, myBlockly (a visual block-based language), C++, and Arduino.
Q: Is the myCobot 280 beginner-friendly?
A: Not really. It has a steep learning curve for anything beyond the built-in Record and Playback feature, and the instructions are described as confusing.
Q: What was the most reliable way to get it to complete a repeatable task?
A: Record and Play. Programming through myBlockly or Python was more of a chore, but manually recording a movement sequence and looping it worked reliably every time.
The Verdict
The Elephant Robotics myCobot 280 is a clever, expertly designed piece of tech that’s endlessly customizable. With kits running $600 to $800, it’s steep for anyone but the most committed robot fans, especially once accessories get added on. Still, it earns its price with strong functionality, a rugged industrial build, and genuinely professional-grade uses. The instructions fall short and the kit isn’t beginner-friendly, so this is gear for advanced users or anyone willing to put in real time learning it. That tracks, given research and education were the whole point behind its design. If you can handle the investment of both time and money, the myCobot 280 might be your next favorite desktop companion.
Price: $638.89 for the myCobot 280 Robotic Arm with G-Base and Clamp, $129.99 for the Adaptive Gripper, $129.99 for the Gamepad controller
Product Link: Elephant Robotics
Source: The sample of this product was provided by Elephant Robotics.
RATING: 3 stars


