
REVIEW – The ANYCUBIC Photon UV LCD SLA 3D Printer is a low cost entry into resin based 3D printing, and it is very different from the filament printers most hobbyists picture first. Instead of feeding melted plastic through a nozzle like an FDM machine, this LCD SLA printer uses 405nm UV light to harden photosensitive liquid resin one layer at a time. That process can produce much finer detail, but it also brings more mess, more safety precautions, and more cleanup.
The value argument is strong on paper. The Photon UV was priced at $249.99 for the printer by itself, or $289.99 when bundled with a bottle of resin. My experience was more complicated. After a lot of test attempts, several emails with support, and many hours reading 3D printing forums, I eventually found settings that let me complete four full prints. Getting to that point was not easy. This writeup is mostly about living with the Photon UV itself, not deciding whether SLA or FDM is the better printing technology for every user.
How the Photon UV Works
The Photon UV is a bottom up LCD SLA printer. The UV light source sits underneath the resin vat, and the print platform lowers into the liquid resin. As each layer cures against the LCD window, the platform lifts, so the finished object seems to grow upward out of the vat.

The printer arrived in a plain cardboard box, held securely by shaped foam inserts.

Included in the Box
ANYCUBIC includes the basics needed to assemble the printer, start a test print, and handle resin with at least minimal protection.
- ANYCUBIC Photon UV LCD 3D Printer
- 250ml Resin
- Resin Vat
- Print Platform
- Mask
- Scraper
- Tool set
- USB Drive
- 3 Pairs of Nitrile Gloves
- User Manual
- 10 Paper Funnels
- Power Supply and Cord
- Door Handle
- Extra Screws
- Extra FEP Film

Specifications
- Printing Technology: LCD-based SLA (Stereolithography)
- Light-source: UV integrated light (Wavelength 405nm)
- XY DPI: 47um (2560 x 1440)
- Y axis resolution: 1.25um
- Layer resolution: 25 – 100um
- Printing speed: 20mm/h (.78"/h)
- Rated Power: 40W
- Printer size: 220mm x 200mm x 400mm (8.66" x 7.87" x 15.74")
- Printing volume: 115mm x 65mm x 155mm (4.52" x 2.56" x 6.1")
- Printing material: 405nm photosensitive resin
- Connectivity: USB Port
- Weight: 6.6kg (14.55lb)

Hardware and Controls
The Photon UV looks much better than I expected from a budget resin printer. The black metal cabinet, yellow clear panels, blue anodized aluminum parts, and red accent hardware give it a polished workshop look. The resin vat and print platform are both anodized aluminum, while the enclosure is metal with tinted plastic inserts.

The side handles are practical and make the printer easier to reposition.

A powerful rear fan vents heat and resin fumes from the cabinet while printing. The smell is strong, and this is absolutely a machine to use only in a well ventilated area.

The large front door swings upward, giving direct access to the resin vat, build platform, and LCD area.

The touch interface is simple to learn and easy to move through. The main complaint is contrast, since the screen can sometimes be hard to read.

Assembly and First Setup
Initial assembly is simple. The first physical step is attaching the knob to the front door.

After that, the protective plastic film needs to be peeled from the yellow panels.

The external power supply plugs into the back of the cabinet.

Once power is connected, the printer can be switched on from the front panel area near the USB port.

The more sensitive part of setup is installing and leveling the print platform.

The platform slides onto its bracket and is tightened with the red securing knob. Once it is mounted, the leveling process begins.

ANYCUBIC has you place a sheet of paper over the LCD screen and lower the platform until it presses against the paper.

With the platform down, the included Allen wrench is used to loosen the platform screw enough to adjust the angle. I had to repeat this more than once before it felt right. The platform must sit level and parallel to the LCD so cured resin bonds correctly during the first layers.

After leveling, tighten the platform screw again and check the paper. It should pull free with noticeable resistance.

Next, raise the platform and test the UV light from the control panel.

The UV test is mainly a post shipping check. A full rectangle on the LCD indicates the light system is working as expected.

Installing the resin vat is straightforward. Raise the platform for clearance, slide the vat in until it reaches the rear limit screws, and tighten the red nuts on both sides to hold it in place.

Resin Safety and Slicer Prep
This is where the process stops feeling like ordinary desktop printing. Liquid resin is irritating to skin before it cures, so the included mask and nitrile gloves are not optional. Isopropyl alcohol should also be nearby for cleaning anything that contacts uncured resin.


With gloves on, carefully pour resin into the vat until it is about one third full.

Do not overfill the vat. When the platform lowers, too much resin can overflow onto the work surface, and slightly toxic liquid resin is exactly the kind of mess you do not want. The fumes are also potent, so good ventilation matters every time the printer is used.

The included USB stick is used both for software setup and for moving prepared models to the printer.

On a PC or Mac, install ANYCUBIC Photon Slicer from the USB drive.

Photon Slicer is a basic tool for converting 3D models into files the Photon UV can read. It also lets you add and remove support structures where the model needs them.

After slicing, copy the file to the USB stick and insert it into the Photon UV. The port location is not ideal because it sits close to the power switch, making it too easy to bump the printer off by accident.

ANYCUBIC ships the USB drive with a standard test model already loaded, so I started there. Other models downloaded online can also be prepared for the Photon UV with enough tweaking.

Printing, Waiting, and Cleaning
Once the printer is loaded with resin and the file is on the USB stick, printing is mostly a matter of selecting the model on the touch screen and pressing print.

Then the waiting begins.

And continues.

All 3D printing takes patience, but SLA felt especially slow to me. Settings can be changed to shorten print times, but reducing exposure time or changing the base layer count too aggressively can turn a long job into a failed one.

During a run, the platform repeatedly dips into the resin and lifts out again. The screen shows the current layer and progress percentage.

The process is still fascinating to watch, especially when the model appears to emerge from the liquid.

After a few hours, depending on the complexity of the model, the print finishes.

The Photon UV beeps several times when the job is done, then raises the platform above the vat.
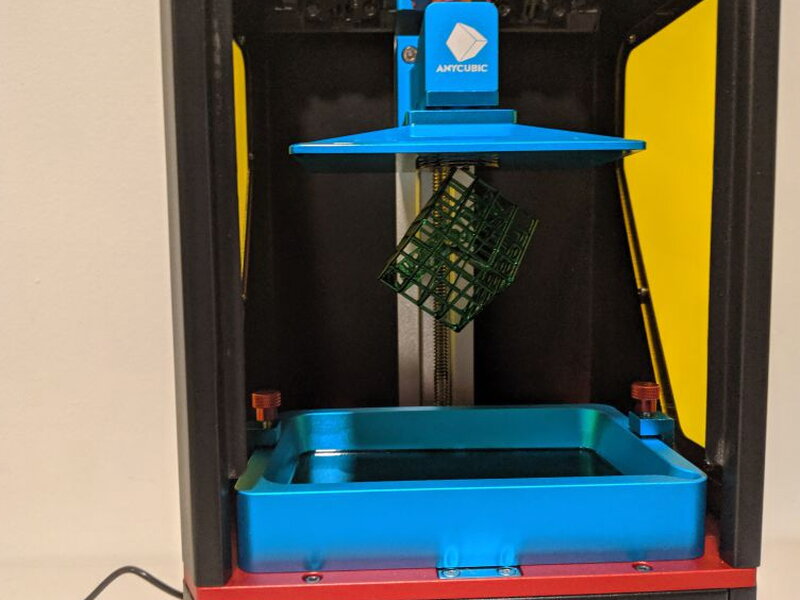
Letting the print hang for a short time helps excess resin drip back into the vat.

After a couple of minutes, put the protective gear back on before removing the model.

Loosen the red securing knob and carefully slide the platform off its bracket.

The cured base can cling firmly to the platform, so removal takes steady pressure with the scraper.

Be gentle. At this point the model is not fully cured and can still be damaged.

Once removed, the model needs to be rinsed or soaked in isopropyl alcohol to wash away uncured resin.

After the alcohol rinse, let the part dry, preferably in direct sunlight, so UV exposure can finish curing the resin.

The resin vat and print platform also need to be cleaned with isopropyl alcohol. Before that, drain and filter the remaining resin. Loosen the vat retaining screws and slide the vat out carefully.

The included paper filters catch cured fragments that may have broken loose during printing. Resin is expensive, so being able to reclaim the leftover liquid is useful. The vat has a pour channel, but I found it easier to filter into a paper cup first and then return the resin to the bottle.

With the vat empty, clean it thoroughly. Failed prints, and I had plenty of them, often leave cured resin stuck to the bottom film. Scrape slowly so the thin film at the base of the vat does not tear.

Print Results
When the Photon UV succeeds, the results are genuinely impressive. Compared with FDM printing, the fine detail from SLA can be amazing.

ANYCUBIC chose a test cube that shows off the strengths of resin printing. The latticework and internal Photon style layers would be difficult for many FDM printers to reproduce cleanly, and the finished quality surprised me.

The other successful prints looked excellent as well, especially the Benchy tugboat benchmark. The problem was consistency. It took a long stretch of failed prints, slow adjustments, and messy cleanup before I found settings that worked reliably enough. Still, the finished models made it clear why people put up with SLA printing.

The Good
- Easy initial setup
- Prints, when they work, are high detailed
- User interface is easy to learn and navigate
- Well-designed, sturdy build quality
The Not So Good
- Needs much better instructions and product support
- Printing success was sporadic
- No way to tell if a print fails early on without pausing it
- Cleaning after each print is time-consuming and messy but that is SLA printing in general

Quick Questions
Q: Is this a good stand-in for a filament (FDM) 3D printer?
A: No, it’s a resin-based SLA printer, a fundamentally different process with more mess, more safety gear (gloves, mask, ventilation), and more cleanup than FDM printing.
Q: Did prints succeed consistently?
A: No, getting reliable settings took a long stretch of failed prints, slow adjustments, and messy cleanup before four full prints finally succeeded.
Q: Does it come with resin included?
A: It depends on the bundle. The printer alone was $249.99; a bundle with a bottle of resin was $289.99.
Q: Can it tell you early if a print is failing?
A: No, there’s no way to detect a failing print early without pausing it to check.
Final Verdict
The ANYCUBIC Photon UV is a sturdy, attractive, affordable resin printer that can produce excellent detail once it is dialed in. The hard part is getting there. The instructions and support experience were not strong enough, and ANYCUBIC customer support was no help during my troubleshooting. The bundled ANYCUBIC Slicing Software works, but better free options exist. Even so, I was relieved and excited when the Photon UV finally started producing finished models. At $249.99 for the printer, or $289.99 with a bottle of resin, it is a competitive value for someone willing to accept tinkering, resin safety, cleanup, and inconsistent early results.
I’ve tested a handful of these by now. See The Best 3D Printers I’ve Tested (So Far) for the full rundown.
Price: $249.99 – $289.99 with Resin
Product Link: ANYCUBIC
Source: The sample of this product was provided by ANYCUBIC.


